This guide lists the best NBA 2K26 builds for every position, point guard to center. Each build is tuned for the current gameplay meta, works in Park, Rec, and Pro-Am, and is designed to balance scoring, defense, and stamina efficiency.
For every position you get exact body settings, height, weight, wingspan, and the final attribute allocation. We highlight critical thresholds that unlock Gold or Hall of Fame badges, note the most valuable badges for the role, and recommend primary and secondary takeovers.
The builds are selected using clear criteria, repeatable shot creation, reliable finishing, enough three point pressure, credible on ball and team defense, and physicals that support the role. Numbers come first, then playstyle guidance to help you use them correctly.
Use the quick links to jump to your position, copy the settings, and apply the badge plan. Small adjustments are noted where you can flex points without losing important gates or animations.
NBA 2K26 Best PG Build
A 6’7 Point Guard Mid-Post Playmaker Build, HOF Bail Out + Versatile Visionary
You want a big guard that lives in the elbow area, threads passes on time, and still finishes tough. This 6’7 point guard does exactly that. It leans into size and craft, uses elite passing to control tempo, and picks defenses apart from the mid-post. Simple, smart, nasty in the right hands.

Quick summary, what this build does for you
- Role: Crafty Mid-Post Playmaker, Luka-style big PG who runs the half court and punishes switches
- Hall of Fame badges: Bail Out, Versatile Visionary, Break Starter
- Shades of: Oscar Robertson, Luka Doncic, Cade Cunningham
- Best modes: Rec and Pro-Am, also works in Park with good spacing
Build card, at a glance
| Position | Point Guard | Archetype | Crafty Mid-Post Playmaker |
| Height | 6’7″ | Weight | 230 lb |
| Wingspan | 7’0″ | Body shape | As preferred |
| Recommended Takeovers | Primary Playmaking, Secondary Shot Creator. Swap to Spot Up if your team needs more catch-and-shoot pressure. | ||
Why this build works right now
Size at guard is a cheat code when you pair it with vision and footwork. You post guards, you see over traps, and you still pull up from the elbow like it is practice. The badge trio in purple is perfect for this identity. Bail Out saves possessions, Versatile Visionary rewards creative passing windows, Break Starter turns every board into a fast break. You win on reads, angles, and pace, not just raw speed.
Body settings, keep these exact
- Height: 6’7″
- Weight: 230 lb
- Wingspan: 7’0″
- Position: Point Guard
Attributes, full breakdown

Finishing
| Attribute | Value | Notes |
|---|---|---|
| Close Shot | 84 | Standing touch, putbacks when guards switch |
| Driving Layup | 94 | Craft, body control at full speed |
| Driving Dunk | 73 | Basic dunk packages, keep it safe |
| Standing Dunk | 45 | Occasional drop-in after seals |
| Post Control | 87 | Elbow work, shakes, counters against smalls |
Shooting
| Attribute | Value | Notes |
|---|---|---|
| Mid-Range Shot | 89 | Elbow pull-ups, high percentage looks |
| Three-Point Shot | 83 | Respectable spot-up threat, opens driving lanes |
| Free Throw | 71 | Enough for Rec, practice the cue |
Playmaking
| Attribute | Value | Notes |
|---|---|---|
| Pass Accuracy | 97 | A+ dimes, live-dribble lasers, instant outlets |
| Ball Handle | 87 | Silver Ankle Assassin in panel, controlled combos |
| Speed With Ball | 73 | Not a burner, win with angles and screens |
Defense and Rebounding
| Attribute | Value | Notes |
|---|---|---|
| Interior Defense | 59 | Emergency contests only |
| Perimeter Defense | 74 | Use your size, angle drivers to help |
| Steal | 60 | Dig in lanes, do not gamble |
| Block | 31 | Token chases, focus on verticality |
| Offensive Rebound | 50 | Occasional crash from the slot |
| Defensive Rebound | 71 | Secure and run Break Starter plays |
Physicals
| Attribute | Value | Notes |
|---|---|---|
| Speed | 73 | Use pace changes, not sprints |
| Agility | 65 | Footwork over foot speed |
| Strength | 74 | Hold your line on bumps and seals |
| Vertical | 58 | Finishing relies more on angles than pop |
Badges and key callouts

Playmaking badges
| Badge | Highest Tier Shown | Why it matters |
|---|---|---|
| Bail Out | Hall of Fame | Save broken drives, kick to corners without turnovers |
| Versatile Visionary | Hall of Fame | Creative passing windows become easy reads |
| Break Starter | Hall of Fame | Turns rebounds into instant runouts |
Takeovers, what to pick and when
- Primary: Playmaking, for faster, safer passes and more control of pace.
- Secondary: Shot Creator, for pull-ups and leaners from the elbows. If you sit in corners more, switch to Spot Up.
How to play it, simple rules that win
- Start in the mid-post. Force a switch, then punish with the 89 mid or a back-down to a kick.
- Live in two-man actions. Handbacks and angle screens hide the 73 SWB and create free lanes.
- Pass on time. 97 Pass Accuracy wants quick reads. Hit the skip, relocate, repeat.
- Defend with position. Shade to help, contest high, avoid reach animations at 60 Steal.
Pros and cons
Pros
- Elite passing, A+ delivery from all spots
- Finishes layups at full speed
- Deadly elbow pull-ups and shakes
- Multiple Hall of Fame playmaking tools
Cons
- Rarely disrupts the ball on defense
- Lacks raw foot speed for a point
- Three-point is good, not nuclear, so spacing matters
If you want deeper range, pull a few points from Standing Dunk and Interior Defense, then move Three-Point toward 86 to strengthen off-ball gravity.
How does this work with another primary ball handler?
Live as a connector. More off-ball screens, more handbacks, more cross-court skips. Keep Playmaking takeover for that style.
What animations fit?
Use controlled size-ups and strong pull-up packages. You are playing pace and angles. Pick safe dunk packages that do not invite chase-downs.
NBA 2K26 Best Shooting Guard Build
A Shai Gilgeous-Alexander Style Point Guard or SG Build, 2-Way Mid-Paint Maestro
You want a big guard who lives in the elbows, slices into the paint, and guards his yard. This 6’6 SGA-inspired point build plays smooth, punishes with touch, and wins a lot of boring possessions that decide games. It could well be the best shooting guard build in NBA 2K26.

Quick summary
- Role: 2-Way Mid-Paint Maestro, slashing shot-creator who pressures mid-range and finishes off two feet
- Shades of: Jo Jo White, Chauncey Billups, Shai Gilgeous-Alexander
- Go-to badges: Break Starter (Gold), Float Game (Gold), Interceptor (Gold)
- Strengths shown: Smooth touch at the rim, elbow jumper on a string, court vision, hard to chase in transition
- Weakness: Limited aerial pop, so win with craft and timing
Build card
| Position | Point Guard | Archetype | 2-Way Mid-Paint Maestro |
| Height | 6’6″ | Weight | 195 lb |
| Wingspan | 6’10” | Body shape | As preferred |
| Recommended Takeovers | Primary Shot Creator, Secondary Lockdown or Playmaking depending on team needs | ||
Attributes

Finishing
| Attribute | Value | What it gives you |
|---|---|---|
| Close Shot | 77 | Standing touch and short hooks |
| Driving Layup | 90 | Slithery finishes, euro and float packages shine |
| Driving Dunk | 57 | Basic one-handers, keep it safe |
| Standing Dunk | 47 | Occasional drop-in under the rim |
| Post Control | 79 | Elbow jabs and shake game versus switches |
Shooting
| Attribute | Value | What it gives you |
|---|---|---|
| Mid-Range Shot | 88 | Elbow pull-ups, post fades, short curls |
| Three-Point Shot | 79 | Respectable spot-up, punishes soft gaps |
| Free Throw | 95 | A+, money in Rec |
Playmaking
| Attribute | Value | What it gives you |
|---|---|---|
| Pass Accuracy | 88 | On-time kicks and hit-aheads |
| Ball Handle | 84 | Controlled chains, space with hesitations |
| Speed With Ball | 80 | Tempo guard, not a pure burner |
Defense and Rebounding
| Attribute | Value | What it gives you |
|---|---|---|
| Interior Defense | 60 | Emergency contests and wall-ups |
| Perimeter Defense | 85 | Point-of-attack control, angle the drive |
| Steal | 85 | Lane digs, quick hands on pick-ups |
| Block | 35 | Token chases, focus on body position |
| Offensive Rebound | 41 | Selective crashes from the slot |
| Defensive Rebound | 45 | Guard your board, outlet early |
Physicals
| Attribute | Value | What it gives you |
|---|---|---|
| Speed | 86 | Change-pace attacks and close-outs |
| Agility | 80 | Slides and micro-adjustments in space |
| Strength | 74 | Hold lines on bumps, post counters |
| Vertical | 63 | Finish with angles, not pure pop |
How to play it
- Hunt the nail. Get to the elbows, jab, rise for the 88 mid, or step through to a floater. Simple and repeatable.
- Drive with cadence. Two speed changes, one decisive gather. You are at 90 layup, so finish through shoulders, not over heads.
- Live in two-man actions. Handbacks and angle screens keep the ball moving. Read tags and hit the skip off one dribble.
- Defend with positioning. Shade middle to help, use the 85 Perimeter and 85 Steal to bother handles, then leak for easy points.
Tuning ideas if you want more bite
- Push Ball Handle to 86 for Silver Ankle Assassin. Trim Block or Standing Dunk if the point budget is tight.
- If your team needs more spacing, slide Three-Point from 79 into the low 80s by shaving a few points from Close Shot and Offensive Rebound.
- Prefer more poa defense, lift Perimeter Defense toward 90 and switch Secondary to Lockdown.
FAQ
Can I unlock Silver or Gold Ankle Assassin on this build?
Yes. You’re at 84 Ball Handle, which previews Bronze. Bump to 86 BH for Silver. Push to 93 BH for Gold, and 98 BH for Hall of Fame. Trim Block and a few points from Close Shot or Offensive Rebound first if you need the budget.
How do I add more three-point shooting without killing the identity?
Slide 2–3 points from Close Shot and Offensive Rebound, then move Three-Point into the low 80s. You’ll still live at the elbows, you’ll just punish soft gaps harder.
Best takeovers for comp games?
Primary Shot Creator to juice pull-ups and leaners. Secondary Lockdown if you’re guarding POA every trip. If your team already has a stopper, go Secondary Playmaking to widen passing windows.
What badges should I core first?
Prioritize your finishing and shooting staples that trigger every possession, then look at Float Game or your preferred middy badge. For defense, pick a lane, either POA contests or lane steals, then core the one you trigger most in your film.
What animations fit the mid-paint style?
Controlled size-ups, quick hesitation escapes, a smooth pull-up middy, and reliable floater packages. Dunk packages should be safe, front-hand options that don’t invite chase-downs.
Any Rec-specific tweaks?
You already have 95 FT, so you’re good. If you never miss, you can shave 2–3 FT to raise Perimeter Defense or Three-Point a tick.
How do I defend taller guards and wings?
Angle middle, chest up, and use your 85 PER/85 STL to bother the gather. Dig at the first bounce, then release to recover. Don’t chase blocks, your 35 Block is a token stat.
What team comps love this build?
Two ideal fits: a stretch five that clears the lane, or a rim-running five that screens high while you live in handbacks and elbow touches. Both keep your mid-paint reads clean.
NBA 2K26 Best SF Build – Inside Out High-Flying Slasher
You want a two guard that jumps out the gym, keeps the three ball honest, and still handles at a primary level. This Ant-style 6’4 shooting guard does exactly that. It is a poster machine that can pull from deep and break down defenders without burning your stamina bar.
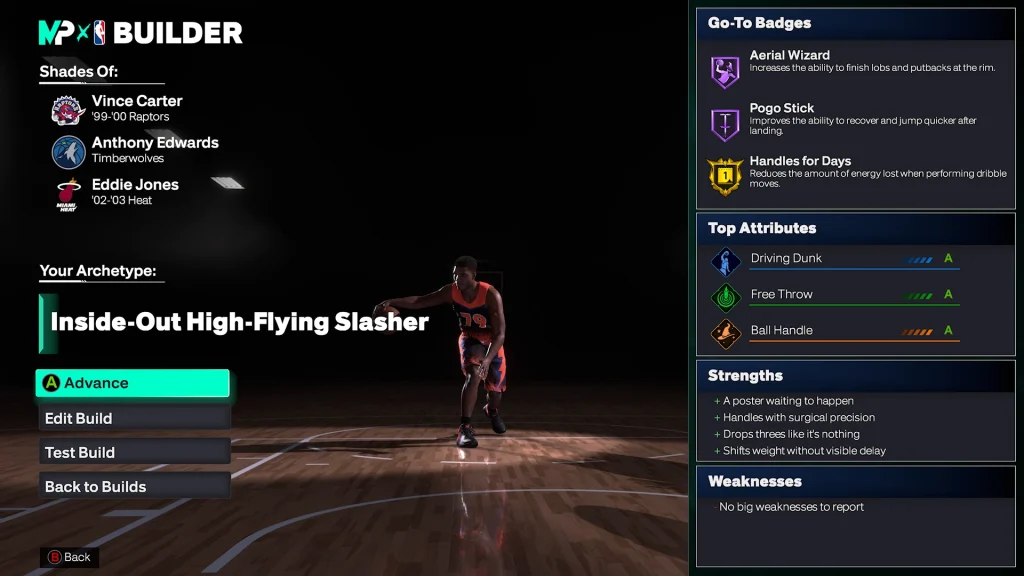
Quick summary
- Role: Inside-Out High-Flying Slasher, rim pressure first with real perimeter threat
- Shades of: Vince Carter, Anthony Edwards, Eddie Jones
- Go-to badges on your panel: Aerial Wizard (Hall of Fame), Pogo Stick (Hall of Fame), Handles for Days (Gold)
- Strengths listed: Poster threat, precise handles, confident three, quick directional shifts
Build card
| Position | Shooting Guard | Archetype | Inside-Out High-Flying Slasher |
| Height | 6’4″ | Weight | 222 lb |
| Wingspan | 6’10” | Body | As preferred |
| Suggested Takeovers | Primary Slasher, Secondary Shot Creator or Spot Up depending on team spacing | ||
Why this build cooks
It pressures the rim on command, then punishes sagging with an easy catch-and-shoot. You get Hall of Fame finishing tools, a money 88 three, and just enough ball control to self-create. Defensively you are serviceable at the point of attack with hands that bother lazy passes. It is everything you want from a modern scoring two.
Attributes

Finishing
| Attribute | Value | Impact |
|---|---|---|
| Close Shot | 78 | Push shots and quick putbacks |
| Driving Layup | 80 | Crafty gathers, floaters when the rim is stacked |
| Driving Dunk | 93 | Poster animations and fast break hammers |
| Standing Dunk | 63 | Drop-ins under the rim |
| Post Control | 80 | Elbow bumps and spins vs smaller guards |
Shooting
| Attribute | Value | Impact |
|---|---|---|
| Mid-Range Shot | 80 | Pull-ups and fades off handbacks |
| Three-Point Shot | 88 | Catch-and-shoot pressure and quick stop threes |
| Free Throw | 90 | Rec safety, punish hacking |
Playmaking
| Attribute | Value | Impact |
|---|---|---|
| Pass Accuracy | 71 | Simple kickouts and hit-aheads |
| Ball Handle | 90 | Silver Ankle Assassin threshold reached, clean combos |
| Speed With Ball | 82 | Explode off screens, keep pace under control |
Defense and Rebounding
| Attribute | Value | Impact |
|---|---|---|
| Interior Defense | 60 | Emergency wall-ups |
| Perimeter Defense | 83 | POA contests, shade to help |
| Steal | 80 | Lane digs and bump steals |
| Block | 68 | Chase-down threats from behind |
| Offensive Rebound | 55 | Selective crashes |
| Defensive Rebound | 48 | Guard gets out, bigs clean the glass |
Physicals
| Attribute | Value | Impact |
|---|---|---|
| Speed | 82 | Run lanes and chase in transition |
| Agility | 86 | Quick lateral shifts to beat angles |
| Strength | 75 | Absorb bumps on takeoff |
| Vertical | 84 | Lob windows and posters |

How to play it
- North-south first. Attack closeouts and empty corners. Use your 93 Driving Dunk and vertical to finish loud.
- Shoot rhythm threes. 88 Three-Point punishes sagging. Catch, set, fire. No hero ball unless you have takeover.
- Keep combos simple. Two-move chains into a decisive gather. Let Silver Ankle Assassin handle the separation.
- Defend angles, not highlights. 83 PER and 80 STL want positioning and digs, not spam steals.
Tuning options
- Want Gold Ankle Assassin: push Ball Handle to 93 by shaving a few points from Close Shot and Pass Accuracy.
- Need more POA defense: move 2 to 4 points from Standing Dunk and Post Control into Perimeter Defense.
- Park only: trim Free Throw a bit, raise Speed or Strength to bully smaller guards.
FAQ
What are the cleanest takeovers for comp?
Primary Slasher to juice contact animations. Secondary Shot Creator if you self-create a lot, or Spot Up if the team lives five-out and you take more catch-and-shoots.
How do I unlock Gold or HOF Ankle Assassin?
You already have Silver at 90 Ball Handle. Raise to 93 BH for Gold. Raise to 98 BH for Hall of Fame. Fund it by trimming Close Shot, Standing Dunk, or a couple points of Pass Accuracy.
Is 71 Pass Accuracy enough?
For a scoring two, yes. You will make simple kickouts and hit-aheads. If you want laser dots through tight windows, push Pass Accuracy into the high 80s and consider Playmaking takeover.
What dunk and dribble packages fit?
Use fast, safe dunk packages that keep the ball tight to the body. For dribbles, pick a crisp size-up, a reliable hesitation, and a quick stepback. Keep the chain short, then explode.
How should I defend bigger wings?
Shade middle, absorb the first bump, then use your 80 Steal to dig on the gather. Do not chase blocks, your 68 Block is there to clean up, not hunt swats.
Can this run backup point?
In spurts, yes. The handle is there, and the three ball keeps the floor open. If you want full-time secondary creator duties, raise Pass Accuracy into the low-mid 80s.
Any Rec specific tweaks?
Keep the 90 FT. If you never miss, you can drop 2 to 3 points to lift Perimeter Defense or Speed With Ball.
NBA 2K26 Best PF Build
A Giannis-Style Power Forward Build, Physical Mid-Paint Cleaner with HOF Aerial Wizard
You want a violent slasher at the four who lives in the paint, hits the glass, and sprints the lane. This 6’11 PF build does exactly that. It is all pressure at the rim with enough mid-range to keep tags honest, and it packs a purple Aerial Wizard to finish lobs and putbacks at a silly rate.

Quick summary
- Role: Physical Mid-Paint Cleaner, downhill finisher, rim runner, putback machine
- Shades of: Giannis Antetokounmpo, Karl Malone, Larry Nance
- Go-to badges shown: Aerial Wizard (Hall of Fame), Layup Mixmaster (Gold), Float Game (Gold)
- Strengths listed: Threat above the rim, imposing presence, clears the board, efficient mid-range scorer
- Weaknesses: Perimeter shooting is basically a non-factor, reaching fouls if you gamble
Build card
| Position | Power Forward | Archetype | Physical Mid-Paint Cleaner |
| Height | 6’11” | Weight | 243 lb |
| Wingspan | 7’4″ | Body | As preferred |
| Suggested Takeovers | Primary Slasher, Secondary Rim or Glass, pick based on matchup and team rebounding | ||
Why this build is nasty
It plays north south. You crush closeouts, catch everything above the square, and punish tags with quick floaters or short hooks. The badge spread highlights finishing and paint pressure, so you win the math with layups, dunks, and free throws, then clean the glass to finish possessions.
Attributes

Finishing
| Attribute | Value | What it gives you |
|---|---|---|
| Close Shot | 90 | Push shots, putbacks, quick hooks |
| Driving Layup | 93 | Long strides, euro and scoop timing |
| Driving Dunk | 89 | Violent rim runs and clear lanes |
| Standing Dunk | 83 | Catch high, finish through contact |
| Post Control | 65 | Simple bumps, drop steps on switches |
Shooting
| Attribute | Value | Impact |
|---|---|---|
| Mid-Range Shot | 84 | Elbow pull-ups and short pops |
| Three-Point Shot | 52 | You are not a spacer, cut behind ball-watchers |
| Free Throw | 61 | Practice your cue, take the freebies |
Playmaking
| Attribute | Value | Impact |
|---|---|---|
| Pass Accuracy | 78 | Kickouts and outlets, keep it simple |
| Ball Handle | 70 | Straight-line rips, handbacks, no dancing |
| Speed With Ball | 62 | Run the lane, attack off kick-aheads |
Defense and Rebounding
| Attribute | Value | Impact |
|---|---|---|
| Interior Defense | 83 | Wall-ups, chest contests, backline help |
| Perimeter Defense | 72 | Short switches, show and recover |
| Steal | 43 | Do not gamble, secure position |
| Block | 79 | Chase-downs in space, verticality at the rim |
| Offensive Rebound | 61 | Selective crashes, second-chance dunks |
| Defensive Rebound | 86 | Finish plays, outlet early |
Physicals
| Attribute | Value | Impact |
|---|---|---|
| Speed | 71 | Lane sprints and recoveries |
| Agility | 62 | Slides on switches, body positioning |
| Strength | 89 | Seals, box outs, through-contact finishes |
| Vertical | 79 | Lob windows and putback pop |
How to play it
- Run hard, seal early. Sprint the lane, plant on the logo, and call for the lob. If the tag comes high, spin and seal for a standing dunk.
- Attack from the slot. Catch on the move, one gather, explode. Use floaters in the dotted line if the rim is crowded.
- Be the low man. Meet drivers outside the charge circle, vertical up, then own the board and push with a hit-ahead.
- Keep it simple with the ball. Handbacks and slips, no extra dribbles. Your job is pressure, not choreography.
Tuning options
- More rim defense: Pull a few from Post Control and Three-Point, add to Block and Interior Defense if you anchor more.
- More playmaking: If your squad wants handoff hubs, move Pass Accuracy toward 85 to unlock Bail Out bronze, then 90 plus for higher tiers.
- Park only: Trim Free Throw to boost Standing Dunk or Strength.
FAQ
Can this play small-ball center?
Yes. Slide a few points from Three-Point and Post Control into Interior Defense and Block, then pick Rim or Glass as your secondary takeover. You already rebound and finish, so the jump is easy.
How do I unlock Bail Out?
Your Pass Accuracy is 78, which doesn’t meet the threshold. Raise Pass Accuracy into the mid-80s for Bronze, into the low-90s for Silver or better, and very high 90s for the top tier. Trim Post Control or Free Throw to fund it if you really want the badge.
I can’t shoot threes. How do I keep the floor spaced?
Live north-south. Sprint lanes, slip early, and stay in short-roll space at the dotted line. If they sag, punish with the 84 mid-range or a quick floater. Off ball, 45-cut behind ball watchers and crash the glass.
Best takeovers and when to swap?
Primary Slasher is the default. If you’re anchoring the back line, pick Rim. If your team bricks and you’re the cleanup crew, pick Glass. If you ever raise Three-Point to respectable levels, swap secondary to Spot Up for five-out pockets.
What should I core first?
Aerial Wizard is your money badge, core it. After that, pick the finishing or defensive badge you trigger the most on film. Coring a badge you barely activate is a waste of budget.
Park vs Rec tuning?
For Park, trim Free Throw and push Standing Dunk or Strength. For Rec, keep FT where it is, and add a tick to Defensive Rebound if your team needs one-and-done possessions.
How do I get more rim protection without changing the playstyle?
Shave a couple from Post Control and Three-Point, then raise Block and Interior Defense. You’ll still be a slasher, you’ll just erase more drives.
What finishing packages work best?
Quick two-foot gathers, safe lob finishes, and strong putback packages. Avoid wind-ups. Your job is to get the points, not to audition for a dunk contest.
I foul on reaches. Any fixes?
Yes. With 43 Steal you’re not a pickpocket. Show hands, wall up, and swipe at the end of the gather, not at the start of the drive. You’ll keep the whistle quiet and still bother finishes.
NBA 2K26 Best Centre Build
A Jokic-Style Center Build, 2-Way Triple-Double Threat with HOF Bail Out + Versatile Visionary
You want a big who runs the offense without killing spacing. This NBA 2K26 Jokic center build is that problem. At 7’0, 253 pounds, with a reliable mid and a 90 three, it dimes the floor with 99 Pass Accuracy and punishes deep drops with touch. The badge panel shows three purple playmaking life savers, and the attribute spread covers glass, rim, and bully strength. It is a triple-double machine if you make the right reads.

Quick summary, what this build does for you
- Role: Facilitator at the five who scores from the elbow and spaces the corner when needed
- Archetype on screen: 2-Way Triple-Double Threat
- Shades of: Nikola Jokic, Domantas Sabonis, Victor Wembanyama
- Hall of Fame badges shown: Bail Out, Versatile Visionary, Break Starter
- Strengths listed: Facilitator everyone loves, efficient mid-range scoring, elite defensive rebounding, soft touch at the rim
- Watchouts: Can be moved off spot if you do not lean into strength and box-out angles, speed and agility are modest so pick your switches
Build card, at a glance
| Position | Center | Archetype | 2-Way Triple-Double Threat |
| Height | 7’0″ | Weight | 253 lb |
| Wingspan | 7’0″ | Body shape | As preferred |
| Recommended Takeovers | Primary Playmaking, Secondary Spot Up Precision or Rim. Swap based on team spacing and matchup. | ||
Why this build works right now
It bends coverage from the five without forcing five-out every possession. Defenses choose between showing two to the ball on handsoffs or giving up elbow pull-ups and backdoor lasers. Your 99 Pass Accuracy and purple playmaking badges protect possessions, your 90 three keeps the big honest, and 99 Strength with 99 Interior Defense makes you a real presence at the other end. You are the connective tissue, the outlet, and the closer, all in one slot.
Body settings, keep these exact
- Height: 7’0″
- Weight: 253 lb
- Wingspan: 7’0″
Attributes
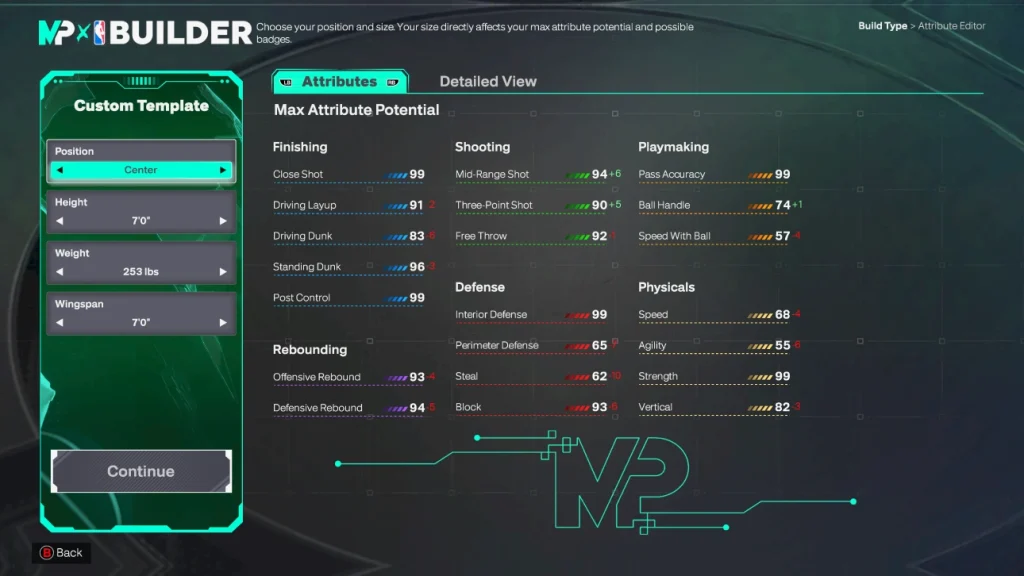
Finishing
| Attribute | Target | What it gives you |
|---|---|---|
| Close Shot | 99 | Push shots, hooks, putback touch |
| Driving Layup | 91 | Fluid finishes on slips and cuts |
| Driving Dunk | 83 | Safe packages on rolls, lob threat in space |
| Standing Dunk | 96 | Deep seals into easy dunks |
| Post Control | 99 | Shoulder fades, spins, counters on switches |
Shooting
| Attribute | Target | What it gives you |
|---|---|---|
| Mid-Range Shot | 94 | Elbow pull-ups, short pops off DHOs |
| Three-Point Shot | 90 | Corner and slot spacing, pick-and-pop threat |
| Free Throw | 92 | Rec safety, punish hacking |
Playmaking
| Attribute | Target | What it gives you |
|---|---|---|
| Pass Accuracy | 99 | Laser outlets, skip reads, handoff timing |
| Ball Handle | 74 | Comfort for dribble handoffs and pivots |
| Speed With Ball | 57 | Walk-up DHOs, not coast to coast |
Defense and Rebounding
| Attribute | Target | What it gives you |
|---|---|---|
| Interior Defense | 99 | Rim wars, wall-ups, post stops |
| Perimeter Defense | 65 | Short switches, show and recover |
| Steal | 62 | Lane digs, not gambling |
| Block | 93 | Chase-downs and contests |
| Offensive Rebound | 93 | Extra touches, kick-outs for 3 |
| Defensive Rebound | 94 | Secure the board, start the break |
Physicals
| Attribute | Target | What it gives you |
|---|---|---|
| Speed | 68 | Enough to recover from shows |
| Agility | 55 | Footwork over flips, use angles |
| Strength | 99 | Screen power, seals, post position |
| Vertical | 82 | Boards and contests stay lively |
Badges and key callouts
Playmaking badges
| Badge | Highest Tier Shown | Why it matters |
|---|---|---|
| Bail Out | Hall of Fame | Save drives and post ups, kick late without turnovers |
| Versatile Visionary | Hall of Fame | Creative passing windows become easy reads |
| Break Starter | Hall of Fame | One-grab, one-pass fast breaks all game |
Screen-setting note: with 99 Strength you will unlock high tiers of screen badges. Check your badge page after final allocation if you want Brick Wall as a core option.
Takeovers, what to pick and when
- Primary: Playmaking, for crisper DHOs, safer lasers, and a bigger passing sweet spot.
- Secondary: Spot Up Precision if your squad runs five-out pockets, or Rim if you anchor in drop coverage.
How to play it, simple rules that win
- Live in handoffs. Walk into a DHO, flip it into a short roll, then hit the corner skip or elbow pop. Read the tag, not the playcall.
- Punish deep drop. If the big sits, shoot the 94 mid from the nail, then pop to three once the help steps.
- Own the glass, start the break. Secure with two hands, snap the outlet. Purple Break Starter means free points.
- Defend with body position. Verticality first, swipe second. You have 99 Interior and 93 Block, make them finish over contests.
Animations, use these lanes
- DHO and passing style: Pick a quick, stable passing style to pair with 99 Pass Accuracy.
- Post package: Hooks and fades that fit your timing, add a safe standing dunk list for putbacks.
- Jumpshot: High release base that is clean from the elbows and corners, keep the speed comfortable.
Pros and cons
Pros
- 99 Pass Accuracy with three HOF playmaking badges
- 90 Three and 94 Mid keep spacing honest
- 99 Interior Defense, 93 Block, real paint deterrent
- Elite rebounding with 94 DREB and 93 OREB
Cons
- Speed and agility are modest, choose your switches
- Can be moved off spot if you do not leverage 99 Strength and position early
- Ball handle and SWB are for DHOs, not iso drives
FAQ
Do I need the full 90 three?
If your team runs heavy DHOs and short rolls, you can slide a few points from Three-Point to Strength or Rebounding. Keep it near 87 to hold clean catch-and-shoot windows.
Can I anchor a switch heavy defense?
Yes, select Rim as your secondary takeover, keep show-and-recover angles, and use early wall-ups. You are not a wing chaser, you are a reset button at the rim.
What changes for Park?
Raise Standing Dunk and Strength first, trim Free Throw if you never touch Rec. Keep Three-Point high enough to punish sits.